 |
|
How
to Translate SNES Roms |
By Shadow, other information noted as
donated
©1997-98 this and other documents maintain the copyright
of their respective authors
Table of Contents
I wrote this guide for SNES Translating simply because to date, only bits and pieces of info have been floating around on the web! I just want to attempt to keep this an up-to-date source of information about how to translate SNES ROMS. Hopefully, you will find this very useful on your quest. See any errors in my guide? Well I can always be reached for flaming, complaining or correcting at shadow1@dragonfire.net.
Neither I nor any of the authors of respective pieces of information donated
are responsible for the actions taken using this guide. All programs mentioned
in this document maintain a copyright by their respected, official authors.
Any violation of this or malignant action is your fault. By reading this
document, you agree to abolish any sources mentioned above from any conviction.
This was the first SNES Sprite Editor available, it edits 1, 2, and 4 bitplane modes as well as 1 1/2 Kanji mode. It's Pea Soup colored palette may discourage some potentioal users but make no mistake, it is powerful. Unfortunatly it doesn't conveniently align it's tile rows by 8's so for my personal ease, I won't use it for the examples on this page.
I can't make a plug on this one because I haven't used it. Apparently some people do and it comes with documentation. I posted it here as an alternate for those who are not pleased with X-Char.
I'm not gonna beat around the bush. Hex Workshop is the best Hex Editor anywhere! It has a great interface, and find/replace function (stay away from the all) function. It's also one of the easiest to use and best value around. If you're doing work with Hex, this is one godly tool. . Information on what it does and why you need it can be explained later.
Yet another gem by BigWeird. This one changes the bytes offset to whatever you assign them to show in your table. Simply put, you can give hex bits whatever values you need. This was written in QBasic though so it's choppy and tends to crash. Still waiting for another version. If you're not too good at Hex, this is a good way to get experience with it.
Snestool is a utility used for many console operations (though the name
suggests otherwise). It does anything and everything you need it to.. The
only function covered with it in this guide is it's ability to make IPS
patches. Don't let the name fool you, it makes IPS patches for anything
including EXE files and NES ROMS. I think this tool is invaluble.
This is just a general guide to help you during tile editing. The topic,
bitplanes. Below is a list of where to find what and in what bitplane mode;
Hope this clarify's the use of bitplane
modes and helps you to understand where you need to look.
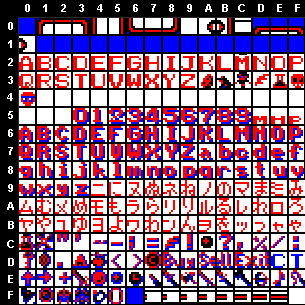
This is real SNES ROM Hacking. Now, you first need to use a sprite editor
and the Final Fantasy 5 ROM to find the text code in the ROM. To do so,
just run SNES Sprite Editor, change to bitplane 2, and scroll through the
endless ROM code until you find something like this (it's pretty far in);
 |
this picture was modified to show a simpler
way of finding the table (normall, 2 rows are appended to each other at
a time. I already added the table notations to this image. Think of battleship,
if it's in row 0 column A it would be 0A.
Now that you have your table, open up the ROM in Hex Workshop and click
find. Enter the Hex bits for the thing you want to find. Let's find Fight.
You'll need to type "65 82 80 81 8D" and hit find. Those will
turn up highlighted so you're ready to enter your new bits. Go about doing
this for the rest of the ROM as you proceed along with your translation.
Using X-Late to edit text is just as bad. I don't need to put much here
but this I'll say. X-Late uses tables to create it's byte assignments.
To make a table, create a file called table.xlt. Now, in this file, you
will go line by line inputing the character to be displayed for each tile.
Again, I'll use the Final Fantasy 5 example. Just use the table you made
before and for each blank space (or non-usable character), hit enter. Now,
You'll do this for 00 through 4A (each hex bit is its own line). Now run
xlate2.exe and open your ROM file. Next, load table, then enter the path
to your table file. The ROM will change to show what you entered as byte
vales and you can scroll through effortlessly reading all the ROM text
and changing it as needed.
Having fun yet?
16x16 Tiles work much like 8x8's but have a different system for layout.
Below is an example of a 16x16 table from Final Fantasy 5;
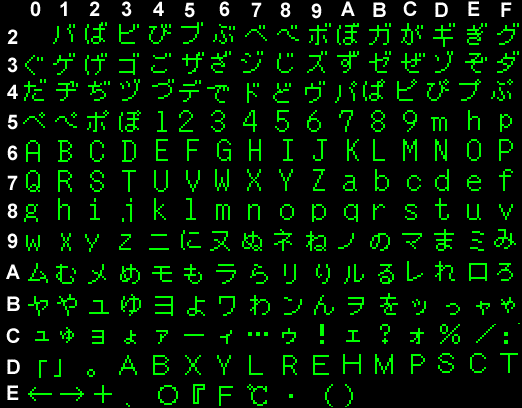 |
Each of these tiles is assigned a hex
bit just like the 8x8 tiles, the layout from this example was 3 tiles.
One tile has the first part, the top half of the next tile has the rest
of the first part, the bottom of that one has the first part of the 2nd
half, the next tile has the rest of the 2nd half. X-Char alignes these
when choosing kanji mode. This picture was taken from X-Char. Other methods
of dialogue tiles are 4 8x8's each containing 1/4 of the tile. Another
layout is 1 1/2 8x8's one being the top and one being the bottom of the
tile. To avoid confusion I posted the pixel sizes and the layouts for each
of the tiles below;
Editing graphics with X-Char is like using paintbrush. Here goes. Scroll through to the graphic as you did with SNES Sprite Editor. Now when you find it, right click on it then left click on the wokspace you want to drop it on (the 16x16 pixeled box in the upper right). Take a couple tiles, clic the paint icon. It wil appear full screen with a 4 color palette from which to pick your colors. Pick your color and draw it onto the tile. When you finish that tile, hit the little door icon and it brings you back to the main screen, do as many as you please.
Editing graphics with Hex is probably the hardest of all 3 ways explained in this guide, however if your ROM does not contain VROM this is the only way to edit it. For this process you're going to need SNES Sprite Editor, to get various information about the graphic you are going to edit. For starters, load up SNES Sprite Editor and open MegaMan X. Now scroll endlessly through the code until you find MegaMan's head (bitplane 4 again). Now, click on the tile once to load it into the workspace near the palette. For this demonstration we're going to change the color of the face (not the helmet) from skin to red. Before you start to color it though, you need to lable it's color codes on a table. Do this by assuming the colors are numbers in order from 0-11. For example, the top one, blue (which is always considered null) would be 0, the next one white would be 1, the 3rd which is which is black 2, the 4th which is red 3, the 5th which is green 4, the 6th which is yellow 5, the 7th which is cyan 6, the 8th which is purple 7, the 9th which is maroon 8, the 10th which is dark grey 9, the 11th which is dark grey A, the 12th which is dark grey B, and the 13th which is regular grey C. Label these on a 8x8 table by the color codes for the graphic of his face (it's multiple tiles). When you are done, one of your tables should look like this.
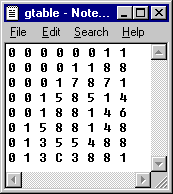
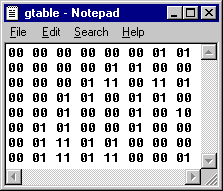
You should notice how 0 is null. Now it's time to convert the 12 numbers to binary. Do this by representing the following numbers as: 0=00, 1=01, 2=1, 3=11, 4=00, 5=01, 6=10, 7=11, 8=00, 9=01, A=10, B=11, C=00. Substitute all the numbers with their binary onto another table. When you're finished it should look like this.
Now you have to split this image into two parts (from 4th bitplane to 2nd). The first table is just all the "right" numbers in the Hex bits. So, if your first set was 00 it would be 0, if it was 01 it would 1, if it was 10 it would be 0, and, well... you get the idea. Your second table is made in the same way except now you use the "left" number in each set. So again, if your first set was 00 it would 0, if it was 01 it would 0, if it was 10 it would be 1, and if it was 11 it would be 1. When you finish making your two tables, they should look like this.
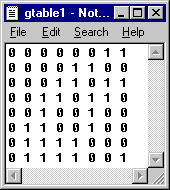
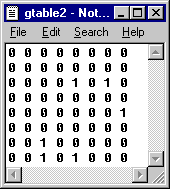
Now each of these lines is a string of binary code. What you must now do is convert that binary code to hex. Telling you how to do this with pencil and paper would force me into a suicidal rage, we don't want that, then I can't finish explaining this! Here's an easier way to do it. Open up Windows'95 Calculator, switch to scientific mode, and and select the "bin" radial option and type in the first line of the first table (which is 00000011), and then select the radial option of "hex". It should come up as 3. There is no such thing as a one-nuber hex bit so you append a 0 in front of the 3. When a line of binary has 0's at the beginning, you have to drop them to type in the binary on the calculator. Entering them is no problem because the calculator just won't accept them. So for example, for the first line you'd just type 11. Now, get the hex for the remaining 7 lines of that table, and the other 8 of the second table. When you finish the line of hex you should come up with both tables combined is;
03 0C 1B 36 24 64 78 79 00 00 0A 00 01 00 20 28
Confused yet? Okay, now change the face from it's whit-red blocking (skin color) to all maroon. After that, do the same thing as before to get the Hex for that. That Hex should be;
03 0C 1B 36 24 64 80 89 00 00 0A 00 01 17 26 31
Now you need to put in your new code over the old code. To do this, open Hex Workshop, click find, type in the first hex, then replace it with the second hex. Now play the game in Snes'96 and see your changes take effect.
A note on this section: This may or may not work in every
ROM. I've only had to use it once and it worked. Some people have suggested
that you could double the numbers, unfortunatly that destroys the integrity
of the binary number. In other words, you'll get non-real Hex bits when
you do that. I say this works in theory because the palette is declared
before the bank. If it is a 4 bitplane bank, it declares all those pallettes
and interprets them by layering the two 2 bitplane images to create the
last few colors. I'll give a better explaination if I need to but for now,
just try it and don't question how it works.
If you're planning to give your work to someone or distribute your translation on the internet, you should make an IPS patch. Do this by opening up Snestool, clicking on Create IPS Patch, selecting the original, untranslated ROM, and then your version of it. That's all there is to it, you now have an IPS patch to distribute freely!
That's all for How to Translate SNES ROMs. If you understood this and plan to translate a game, let me know!.
Well, the people who helped out and what they did are in this neat table;
|
People |
What they Did |
|
Demi |
- For writing an excellent ROMHACK
document - For getting me going - For figuring out 16x16 and being an excellent team member - For being another great team member and identifying banks - For the great idea of doing those notepad screeshots - For continuing to produce great games for us to translate |